
1.) Log into the Centovacast Control board. Your login data was sent to you in a "Shoutcast or Icecast Welcome email" after you bought your arrangement.
2.) To empower the auto DJ you need to stop the worker. Under Server, Click on "Stop" on the left-hand side of the control board.
3.) Under Configuration, Click on "Settings"
4.) Click on the auto DJ tab "Autodj"
5.) Change the Autodj Status to "Enabled"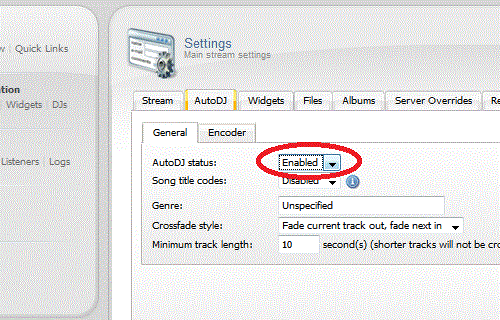
6.) Click "Update" close to the base of the page and you will see the Auto DJ alternatives show up.
7.) Now that the Autodj has been empowered you can begin transferring your music to the worker. Under Autodj, Click on "Files"
8.) Make sure that the "media" organizer is chosen on the upper left-hand side. At the base of the page, click on "Transfer"
9.) Click on "Select Files" and discover the Mp3 documents on your PC that you might want to transfer. When you have chosen your documents click on Open and Mp3s will begin transferring to the worker. note: Centovacast just acknowledges Mp3 documents.
10.) After your music has completed the process of transferring to the "media" organizer you can begin making playlists for SHOUTcast. Snap-on "Return" on the base left to come back to the Main Menu. After you come back to the principle menu Click on the "Media" tab under Autodj and you will see your Media Library spring up with every one of your media recorded by the Artist.
11.) You would now be able to begin making your playlists. Snap-on the Artist that you want, you will see the Albums by that craftsman show up on the right-hand side, click on the Album that you want, at that point, you will see the Songs on the Album show up beneath. Snap-on the Song(s) and drag them to one side into the Playlist. note: make a point to handicap any playlist that doesn't have media in it. You can cripple a playlist by right-tapping on it and afterward clicking "impair." You can likewise make, alter and deal with your playlist(s) by tapping on "Oversee Playlists" at that point click the "alter" catch to one side of the playlist that you wish to alter.
12.) Once you have added Music to your playlist you would now be able to begin the worker. Snap-on "Return" on the base left. At that point Under Server, Click on "Start" and your music will begin Streaming to the Internet.

====================================================================
For Shoutcast Reseller Panel Click Here
